
- How Can a Coach View Swimmers in Events.
- How to Approve Purchases - Membership Products with Document Requirements
- How to Link a Meet to My Club/Organisation
- How To Enter A Relay Team
- Login to Swim Central > Select Administration > Enter your Family Pin, if required.
- Ensure you have the correct club/organisation for which relay teams are being created and entered.
- Select Events and from Events Dashboard, select the specific meet you are looking to enter teams to compete.
- From the Event Home, activate the toggle labeled "Relays Only" to display only sessions with relay races.
- To view the list of events select the correct session
. - Select the event you want to enter
Nominating a Freestyle Relay Team
- Click on Add Team
- Your 4 fastest qualifying swimmers will be automatically displayed on the right-hand side screen by the system, with their times marked by a star and arranged in order of fastest to slowest.
- To add a swimmer to your team, click on the checkbox next to the swimmer's name. A padlock will appear if the swimmer is already listed for another team in the same event.
- To delete a swimmer from your team, select the bin icon.
- The arrow keys
allow the user to move a swimmer up to or down to the next leg.
- Ensure the Export toggle is turned on – as it is necessary to export your team (including the reserves) to Meet Manager. If the Export toggle is not on for the reserves, they will not be exported in the team Hy3 file to Meet Manager but will be included in the team list.
- You will find the minimum number of swimmers required for each Team Export at the bottom of the screen. Please note you if you do not meet the minimum number of swimmers required for a given event, will not be able to select ‘Nominate’.
- Recalculate - clears the swimmers in the nominee screen and populates the 4 fastest available and verified swimmers
- To save your team, please review your selection and click on 'Nominate'. If you need to add additional teams to the same event, simply repeat steps 7 to 15.
Please Note: Your nomination is not complete until you have completed steps 16-23 below.
- After nominating your team/s, you can review each team under its corresponding event by clicking the menu and selecting 'Edit Team'. If you need to remove a team, simply select 'Delete Team'
- Select 'Add to Cart' for each team and the nomination will be added to the club cart
- Once all the teams you wish to nominate have a yellow 'In Cart' status tag, you can proceed to the club cart by selecting 'Club Cart' at the top right-hand corner of the screen. Alternatively, you can click on the menu and select 'Go to Cart'.
- To view the swimmers listed in the team click on view team from the menu
- In the Club Cart you can confirm or remove any team nomination
- Ensure you select the checkbox indicating you have the authority to accept all of the presented Terms and Conditions
- Click 'Create Purchase Order'
You must select 'Create Purchase Order' to enter your Teams regardless of method of payment - Depending upon the meet host's event set up they may enable offline payment for relay teams in addition to credit card payment.
- If you are paying by offline means you must click 'Create Purchase Order' and wait for the credit card page to load before exiting to your club dashboard. This will change the status to pending.
- To pay by credit card please enter the details and select 'Buy Now'. A screen displaying 'Thank you for your Purchase' will show with a summary of your purchases and a confirmation email will be sent to your registered email address and club contact email address.
- Select 'Generate Invoice' if you require one.
- To View the status of your teams go to the Event > Event Session > Select the individual event
Unpaid - Club administrator has selected 'Nominate' for an event team nomination. Any Club Administrator can proceed with the event team nomination.
(Select add to cart -> from the club cart -> confirm Ts & Cs -> Checkout).In Cart - Club Administrator has completed a Team Nomination, selected add to cart and the nomination is in your Club's cart. Only the Club Administrator who completed this step can proceed any further on the event team nomination
(Go to Entity cart -> confirm Ts & Cs -> checkout)Pending - Team submitted & Purchase Order Created (Pending Payment)
Your team's nomination will be exported in the meet entry file if the host club has enabledPaid - Payment Received and Entry Completed. Your team's nomination will be exported in the meet entry file - Alternatively you can view your nominated Teams and their status by going to the Event > Extra Information and select Event Teams accordion.
- A list of your nominated teams will show. Note – only teams with Entry Completed or enabled Pending Payment will be exported in the meet entry file.
-
Draft: Club administrator has selected 'Nominate' for an event team nomination. Any Club Adminsitraotr can add the nomination to the club cart
(Select Add to cart -> from the Entity cart -> confirm Ts & Cs -> Checkout).In Club Cart: Club Administrator has completed a Team Nomination and added it to the Club's cart. Only the Club Administrator who completed this step can proceed any further on the event team nomination.
(go to Entity cart -> confirm Ts & Cs -> checkout)Pending Payment: Team has been nominated and a purchase order is created. To make payment any club administrator who has access to the club's purchases can process the payment.
(Go to Finance tab > Club Purchases > Select the Purchase order and open the accordion > Make Payment)Entry Completed: Team has been nominated and purchase order is complete
Nominating a Medley Relay Team
- Select the relay event you want to enter, click on Team +
- Your 4 fastest qualifying swimmers will be automatically displayed on the right-hand side screen in the order of backstroke, breaststroke, butterfly and freestyle.
- A list of backstroke swimmers will be the default stroke shown in the left-hand screen.
- To amend your team, you can search for swimmers via stroke type and or swimmer's name.
- To add a swimmer to your team, select stroke type and then click on swimmer's name.
- Select Nominate to save your team. Repeat steps 31 to 33 to add additional teams to the same event.
Please Note: Your nomination is not complete until you have completed steps 17-25 above.Nominating a Mixed Medley Relay Team
- Select the relay event you want to enter, click on Team +
- The system will NOT automatically load any swimmers on the right screen. However, Team Candidate details for a Mixed Medley team will be displayed.
- Search via a swimmer's name, gender or stroke type and select a swimmer to add to the team.
- Once you commence selection a selection criteria will be displayed at the bottom of the right screen
- Once you have selected your team, toggle on the export button then click on nominate/update to save your team & repeat steps 34 to 38 to add extra teams to the same event.
Please Note: Your nomination is not complete until you have completed steps 16-23 above.
- How to Edit/Add Committee Positions For Your Club
- How to Update Bank Account Details
- How to Upload ID Documents for Club Account
- Passport - if using the photo page, this is the only ID required (upload as Identity Document 1 only)
- Driver’s license - both the front and back of the license are required to be uploaded separately to Swim Central (Front of driver’s license as Identity Document 1 and back of driver’s license as Identity Document 2)
- Government Issued Identity card - both the front and back of the license are required to be uploaded separately to Swim Central (Front of identity card as Identity Document 1 and back of identity card as Identity Document 2).
- Must match the name of the Account Contact (Located under Club Information > Finances)
- Must clearly display details and is required to be uploaded in colour
- Must be readable and for verification by Stripe ( the ID be placed on a coloured background when taking a photo, (i.e., coloured paper, desk, etc). If the ID is placed on a white background or scanned by a photocopier, it will not be readable and verified.)
- Must not be in PDF or HEIC (Apple) file types.
- Cannot be a digital licence type (Stripe currently does not support this format)
- Document Category - Select Identification
- Document Type - Select correct type (Drivers Licence or Passport)
- Select 'File' to upload your JPEG or PNG Identification file
- Enter the 'Reference Number' such as the drivers licence or passport number
- Enter the expiry date of the ID
- How to link ID Document to Club Account
- Leave their document library by selecting 'Swim Central' icon on the top left
- From their personal dashboard, select Administration
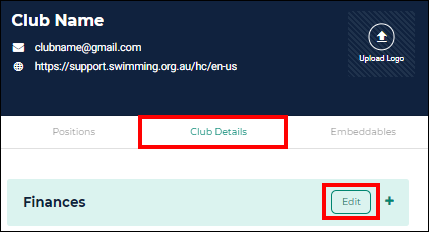
- From the Club's Administration dashboard select Club Information
- Select Club Details tab
- From the Finance accordion click 'Edit'
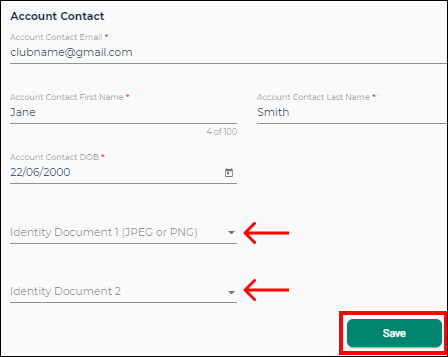
- Under Account Contact, Identity Document 1 field use the drop-down menus to select
Passport or Front of Driver’s License/Identity Card - Identity Document 2 field use the drop-down menus to select
Back of Driver’s License/Identity Card - Select Save
NB - The Date of birth and name on the ID documents must match the
Account Contact Full Name and DOB in Swim Central -
Once all steps have been completed, Stripe will conduct the verification process, which can take up to 24 hours
-
Once you have uploaded these ID documents to the Club Account, they are then stored within the Stripe system.
-
After 48 hours the ID Documents can be deleted from your Documents library.
-
Once deleted, these ID documents will no longer be accessible or visible within Swim Central.
-
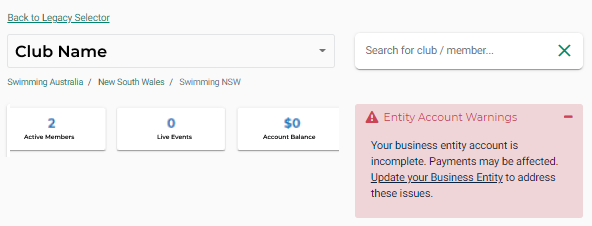
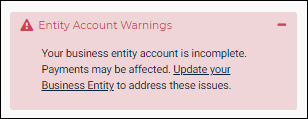
If there is a problem with verification, Stripe will notify the Account Contact via Swim Central on the Administration Dashboard via Entity Account Warnings saying 'Your business entity account is incomplete. Payments may be affected. Update your Business Entity to address these issues.
- Select the notification to view the 'Entity Account Warnings'
- How to Create a Membership Product
- Before starting anything in Swim Central, clubs need to determine their membership fees.
To view your state and national fees select the appropriate state below:
NSW QLD SA VIC TAS NT - You CANNOT DELETE a product so we recommend to save it as a DRAFT so you can review it before you publish it. (Publishing a product makes it available for purchase in the store and most fields are no longer editable)
- Description
- Available Dates (dates the component is available to be used)
- Valid Dates (start and end date of the membership season)
- Price of the component (this includes the National, State, Region (if Applicable) and estimated fees)
- Select 'Next'
- How to create an Association to a participant
Step 1. Provide the coach access in Swim Central within the club information section.
Step 2.

Step 3.

Step 4.

Step 5.

Once your member has completed the purchase for their membership product, to fully activate the membership, and fully process payment, they will need to upload the required documents within 5 days of the membership purchase to give the club administrator time to approve the document as meeting the conditions of the purchase. If the document is not uploaded and approved within 6 days, the membership purchase is cancelled and they will be required to step through the purchase and upload process again.
NB: Any bundle contributor can now view, download, and approve document requirements; this includes Regions, States and National entities.
To Approve the document:
1) Login to Swim Central > Select Administration > Enter your Family Pin if required.
2) Select Finance from the left-hand menu > Approvals > Purchase Approvals.
3) A list of approvals will display with the name of the purchaser and the date of purchase. Please note that if the member is under 18, the name that appears here will be their guardian/parent member.
4) Open the accordion
5) A list of required documents uploaded for the member and its associated product will be displayed.
6) Not Provided Status: The document is not uploaded. Please follow up with the purchaser as the document needs to be uploaded and approved within 6 days, if not completed, the membership purchase is cancelled and they will be required to step through the purchase and upload process again.
7) Not Verified: The document has been uploaded and can be viewed to check that it is correct by clicking the download button.
8) Providing that the document is correct, select Approve.
9) The status will change to verified, and the member is now approved for the purchased membership.
An email will be sent to the purchaser advising them
'Hi Parent Name, Just letting you know that your Purchase Order, totalling $170.00, from 19-10-2021 has changed state to Completed. If you require any assistance relating to this change, please do not hesitate to contact your Principal Membership Provider. Warmest Regards, Swim Central Message Bot'
10) If there are multiple products with document requirements on the same purchase order, once all have been uploaded and approved then all the products become active and payment is processed. If one of the products fails to have the document uploaded and approved by the 6th day, that single product will be cancelled and all other remaining products become active and payment is processed.
11) Expired: The document uploaded has expired and a new document needs to be uploaded by the purchaser. Please note, approving an expired document will not complete a purchase approval.
12) If the document uploaded has the incorrect Document category or Document Type, this can be corrected by selecting Documents button > locate the purchaser from the list > select the document > Edit.
13) Update the information > select save
The Process for the parent:
1) Parent purchases the membership with document requirements > the purchase order will have the purchase status as 'Approval Pending'
2) 2 Emails will be sent > first email advising that the purchase is 'Approval Pending'
3) The second email advising what documents need to be uploaded.
4) Once the documents have been uploaded a notification will appear in the club's notifications on the Admin Dashboard
5) Once all documents have been approved on the purchase order an email will be sent to the purchaser confirming the purchase order has changed to complete.
NB. There is no email advising the purchaser if a product or purchase order is cancelled but they can check the purchase order under their order history
There are three primary reasons to Link a meet to your club/organisation/district:
A) Enable your club/organisation swimmers to see and enter meets from a different state/region/club, from the event calendar
B) Enabling club administrators and coaches to track the attendance of their club members at the meet.
C) To obtain the Team Manager results file
1) Login to Swim Central and select ‘Administration’
2) Enter your Family Pin (if required)
3) Select Events from the left-hand navigation panel
4) From the Events Dashboard Select 'Link Event' button
5) Search for the Club/District/State whose meets you wish to link with your club/organisation/district. Only Club/District/States that have published events will display.
6) A list of events will appear on the right for that Club/District/State.
7) Select the event you want to link to
8) You can view the meet details and click on "Link Event'
9) You will get the option to set a surcharge, if this is not necessary, select Next.
**The surcharge denotes a fee that the visiting club/organisation may wish to add onto the swimmers’ entry costs. For example, aiding in travelling to the event, like covering costs for the coach to attend the event, or paying for a bus to transport participants. That is, the normal entry fee will be paid to the meet host, while the surcharge (if any) is paid to the club/organisation who is linking to the meet.
10) Confirm the link and select Save
11) The meet can be seen on your events dashboard accompanied by a link icon. It will also be visible on your members' calendars under 'My Events' as well as 'Locate an Event'tabs'.
12) To keep track of the nominations for swimmers in your club, you have the option to access or retrieve the information associated with the linked event by viewing or downloading it.
Attendees Report/Attendees Accordion
To obtain a list of attendees for individual and relay events go to Event Dash -> Reports -> Select Attendees Report. A report will be emailed which details the attendees contact information and includes how many individual and relay nominations. This is also visible from the Extra Information tab -> Attendees accordion. Select the individual and a list of their race nominations will display underneath. To view relay only swimmers, look for the relay only tag.
Nominations Report
To obtain a list of attendees and their race nominations go to Event Dash -> Reports -> Select Nominations Report. A report will be emailed which details the attendees and the details of each individual and relay nomination. This is also visible from the Extra Information tab -> Attendees accordion. Select the individual and a list of their race nominations will display underneath.
Teams Report/Team Accordion
To view a list of each team nominated for a relay go to Event Dash -> Reports -> Select Team Reports. A report will be emailed which details the Team Name, Team Alpha Character, Race Number, Race Name, Team Entry Time, List of Athletes Names, Event Cost and the payment Status. Alternatively from the Extra Information tab -> Event Teams -> Select the Team -> Click on Menu -> View Team. You will be taken to the Team Nomination
13) Once the swim meet has completed and the results have been uploaded and verified a tag 'TM File' will display.
14) To export your club's TM file, choose the specific meet, and then, in the results dropdown menu, click 'Download TM Results.' The results file, exclusive to your members, will be sent to you via email.
15) If you see an eye closed icon, this refers to the meet being hidden from the calendar view by the hosting club. For further information please contact the Host club.
This help guide is for Club Administrators wanting to enter relay teams into upcoming swim meets. Only individuals holding club positions are authorised to nominate and finalise purchase orders.
To be able to enter a relay, you need to link the meet with your club/organisation's calendar. Please follow this link for step-by-step instructions.
For instructions on nominating a team for a medley relay, click here
For instructions on nominating a team for a mixed medley relay, click here
Reports
Attendees Report
To obtain a list of attendees for the relay events go to Event Dash -> Reports -> Select Attendees Report. A report will be emailed which details the attendees contact information and includes how many relay nominations. This is also visible from the Extra Information tab -> Attendees accordion. Select the individual and a list of their race nominations will display underneath. To view relay only swimmers, look for the relay only tag.
Nominations Report
To obtain a list of attendees and their race nominations go to Event Dash -> Reports -> Select Nominations Report. A report will be emailed which details the attendees and the details of each relay nomination. This will also include any individual nominations they have. This is also visible from the Extra Information tab -> Attendees accordion. Select the individual and a list of their race nominations will display underneath.
Teams Report
To view a list of each team nominated for a relay go to Event Dash -> Reports -> Select Team Reports. A report will be emailed which details the Team Name, Team Alpha Character, Race Number, Race Name, Team Entry Time, List of Athletes Names, Event Cost and the payment Status.
Alternatively from the Extra Information tab -> Event Teams -> Select the Team -> Click on Menu -> View Team. You will be taken to the Team Nomination
This help guide is for Club Administrators to update committee members and their roles within Swim
Central. For a member to be added to a committee position, they first must be registered as a user with Swim Central
Remove a Member from a Position
1) Login to Swim Central > Select Administration > Enter your Family Pin if required.
2) Select Club Information
Remove a Member from a Position
3) To remove the member from the position select '+' icon of the member you wish to update
4) Add an 'end date' and Save
Add a Member to a Position
5) To add an additional member to a position select 'Add' for the appropriate position
6) Begin typing the email of the member to search.
If their email does not show confirm they are registered with Swim Central
7) Select the member then 'Next' and 'Confirm'.
8) You have the optioin to input an end date otherwise select 'Save'.
9) This will add their name to the ‘Active’ list.
10) To reinstate an inactive member for the same position as previously held, select 'Inactive' from the dropdown box
11) Locate the member's name and select '+' icon
12) Remove the End Date then save
Add an Email for a Position
13) To add an email for the position select Edit and complete the position email field.
This can be the members's email or a club email.
Add a New Committee Position
11) Select 'Add Position'.
12) Select position type (eg Race Secretary)
13) Add the position name (eg Race Secretary)
14) Add an email. This can be a club email (optional).
15) Select next and confirm the details then select 'Save'
16) To view the Member's details select the 'person' icon.
This help guide is for Club Administrators to update Club ABN number and bank account information ONLY. To update all banking details to meet Stripe requirements, please see the help guide for 'How to Edit Club Banking Details for Stripe'.
1) Login to Swim Central > Select Administration > Enter your Family Pin if required.
2) Should your club be missing information, a notification box will appear on the club dashboard. Please update information where possible by selecting 'Update your Business Entity'.
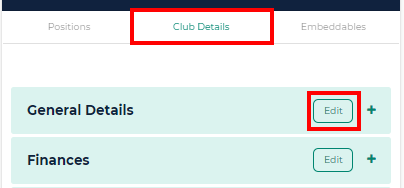
3) Alternatively to update the ABN or account information select Club Information on the club dashboard, Select Club Details and Edit for the General Details section.
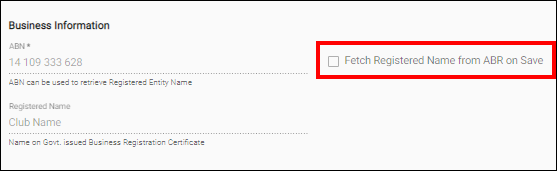
If you know your Club’s ABN, enter it accurately into the ABN* field.
If you do NOT know your Club’s ABN, you can look it up with the ABR using Club name here.
Verification of the ABN occurs when you tick the ‘Fetch Registered Name from ABR on Save’.
Please do not enter the Registered Name manually. Stripe will check the Club ABN against the ABR and then automatically populate the registered club name upon Save if the verification is successful.
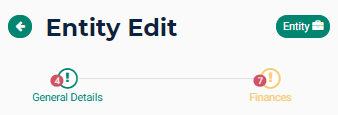
4) Use the navigation icons to finish updating address details or account details for your club.
*In the finances screen, please make sure to verify your BSB and Account numbers and check to make sure that the box ‘Registered for GST’ is correct for your club.
Select Save
**Upon Save, if your verification is unsuccessful for your ABN, and you continue to see a pop-up error notification at the bottom of the page or if you have recently changed/updated your information with the ABR, please contact support@swimming.org.au for further assistance.
Certain identification (ID) is required to be provided by club admins to then be verified by Swim Central's payment software (Stripe) as a security measure. This is in place to protect individual and organisation payments.
1. Valid ID Documents for Swim Central
The following steps must be completed by the person named as the Account Contact in their own profile in Swim Central as steps cannot be completed by someone impersonating the Account Contact.
The types of ID in Australia that can be used for verification are:
ID documents should be scanned as JPEG or PNG files, for upload to Swim Central.
The ID that is uploaded:
2. To upload the identity verification document(s), follow these steps:
1) Login to Swim Central, select the padlock and enter your family PIN to unlock your profile (if you are part of a family group)
2) From your personal dashboard, select Profiles > View Profile
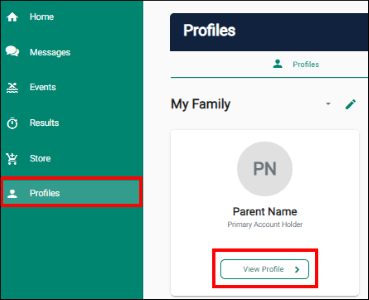
3) Open the Documents accordion and select 'Upload'
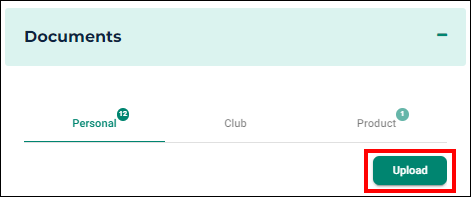
4) Complete the document upload

5) Select Upload and a pop-up screen will appear at the bottom displaying 'Document Uploaded'. If you do not see this notification, please try to upload the document again.
6) Repeat to upload the back of your licence or Government issued Identity Card
To link the ID to the club account, see Step 2 here
After uploading your ID into your personal library, see following instructions for linking the ID to club account:
Linking Identity Verification Documents to a Club Account in Swim Central
The following steps must be completed by the person named as the Account Contact in the club's information > Club Details page in Swim Central as this step cannot be completed by someone impersonating the Account Contact.
To link the uploaded document(s) to the Club account, the Account Contact must follow these steps:

Example Below:
Each season, clubs need to create membership products in Swim Central, for the different
memberships they will be offering that season.
Important Information:
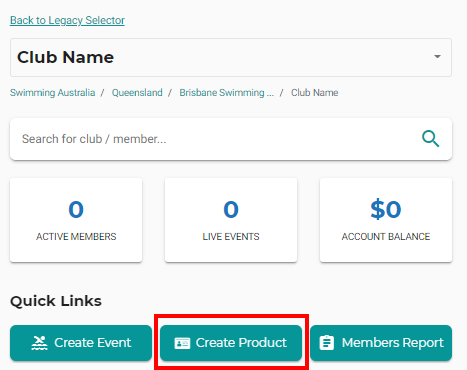
1. Login to Swim Central > Select Administration > Enter your Family Pin if required.
2. From your Club Dashboard select the quick link 'Create a Product'
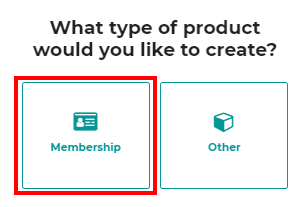
3. Select 'Membership'
NB. 'Other' is for non-membership products only
Membership Components Page:
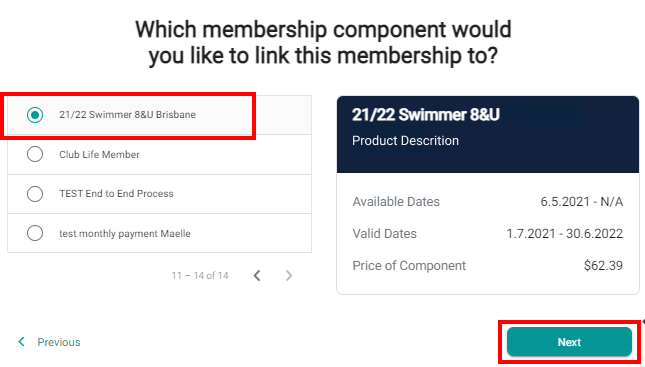
4. Choose the correct component from the list displayed to link to. (eg. 21/21 Competitive Swimmer 8 & Under). If nothing displays, memberships may not be setup as yet.
The details of the component will be displayed
Membership Details Page
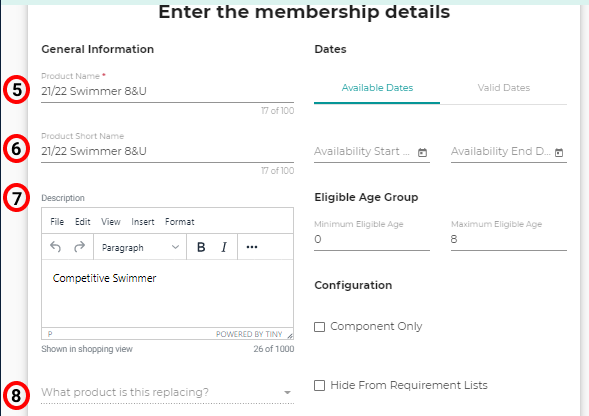
5. Product Name: Enter the name of your membership product. (eg 21/22 Competitive Swimmer 8&U, 21/22 Competitive Swimmer 9&O, 21/22 Parent, 21/22 Coach)
6. Product Short Name: This is the membership name that will display on the digital membership card.
7. Description: A brief description of your membership, which will show in the catalogue
8. What Product is this Replacing? select from the drop-down list the product from the prior year that will be replaced by the product currently being created.
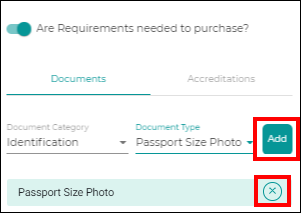
9. Are requirements needed to Purchase? Toggle On if Documents or Accreditation is required.
If a Document or Accreditation is required to purchase this product. Select 'Document
Category' & 'Document type' & select 'ADD' to remove Select 'X' icon
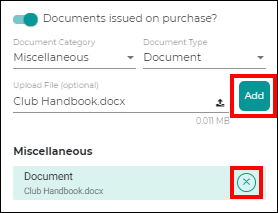
10. Document Issued on Purchase Toggle on if Documents are to be issued upon purchase.
Select 'Document Category' & 'Document type' & upload your file then select 'ADD' to remove select 'X' icon. Once the product is purchased then the document will be delivered to the members library in Swim Central.
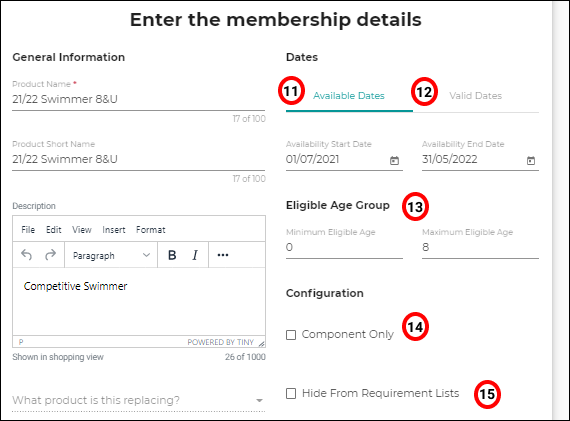
11. Available Dates: Enter the Start and End dates the product is available to purchase from the store.
12. Valid Dates: These are the dates that the product will be available for use (ie season dates) and this is pre-set by your State/National component and cannot be edited.
13. Eligible Age Group: Allows you to set any minimum or maximum age constraints
for your membership product. These are pre-set by your State/National but your Club
can further restrict if required depending on which ages your Club caters for.
14. Component Only: Untick for Clubs
15. Hide From Requirements List - (For Meet Requirements)
Leave blank for wet members (e.g. Swimmers)
Tick for dry members (e.g. Life Members, Coaches, Parents)
Once membership Details are set, Select 'Next'
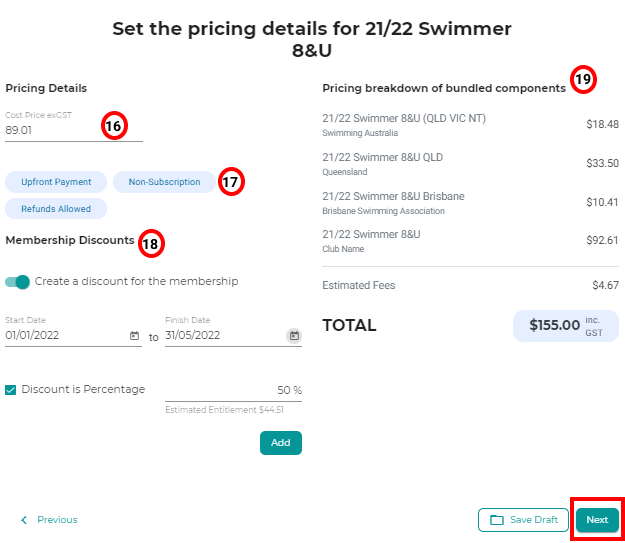
Pricing Details Page: All the pricing details of your membership product will be set here:
16. Cost Price exGST: This is the cost of your Club’s membership component.
If your Club is registered for GST, please take care to enter the cost excluding GST as Swim
Central will add GST to the amount.
17. Product Constraints Upfront Payment, Non-Subscription, Refunds Allowed: The product constraints are read only and are inherited from State & National level and are applied to the product as relevant to your club.
18. Membership Discounts: Create a discount for the membership
Clubs can choose to set early bird or late joiner style discounts against each membership
product created. Toggle on to use this feature and complete:
o Start Date and Finish Date the discount will be applicable
o The discount amount (can be either a $ or a %)
o Select the 'Add' button, to remove Select 'X' icon
Please Note: Pop up warning message will display If you set up a discount = 100%
19. Pricing breakdown of bundled components
You will see an estimated breakdown of the total cost to your Members for this
membership. This includes (from the top) National, your State, your
Region (if applicable), your Club fee (as entered in the Cost Price field and the estimated fees (System and
Transaction).
You can 'Save Draft' your membership product at this stage, to save and continue at a later point in time or select 'Next' to continue.
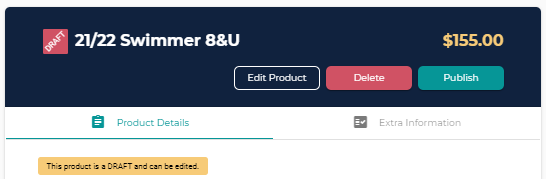
Summary Page: The final screen allows you to check all the details of your membership product.
Ensure you check each field is correct and use the Previous button to go back if required.
Once you are happy with your membership product you can select
Save Draft: You product is saved as a draft and you can then return to it later.
Publish: You can no longer edit your membership product and it will be available to purchase in the store (as per your available dates).

If you Save your draft and return to the product later you have the option to
Edit Product: return to the legacy workflow and update your product then save or publish
Delete: only unpublished products can be deleted
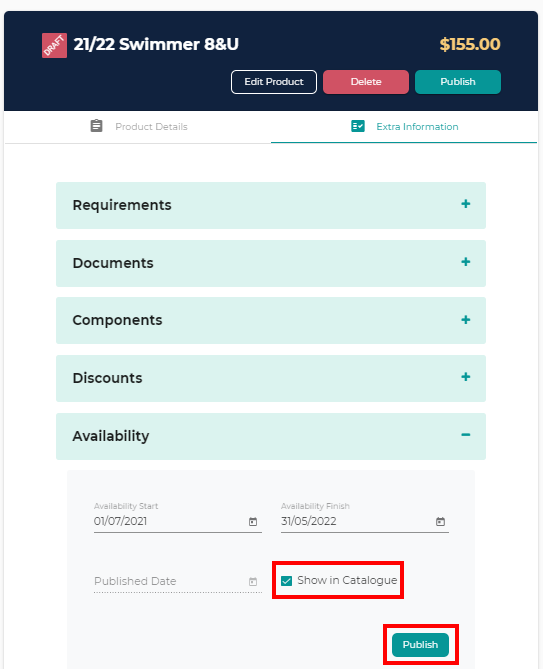
Publish: From the availability accordion tick the show in catalogue and select 'Publish
You can no longer edit your membership product and it will be available to purchase in the store (as per your available dates).
Please click on the below links for further information
The purpose of associating to a participant is to:
- Create a 'link' to a participant that may not have a membership with your entity, to assign purchase orders to and other administrative tasks
- Create a 'link' to a Swimming Australia Accredited coach your entity wishes to associate with and have admin access to their profile
NB. Upon association creation, the participant needs to accept your invite before you can access their details
Please see steps on how to associate as an admin below:
1) Navigate to your entity's Admin Home, and the right hand menu, click on Associate
2) From the Associates Dashboard, click on "Add Associate"
3) Type in the name of the person you wish to associate to. Check the tick box and click on Next
4) Confirm the details, then click on Add
5) The association request will be sent to the participant to action, and you will not be able to view any participant details until acceptance. From this page you have the option to delete the pending association if required.
6) Click the Refresh button to update the page for any changes
